Implementing ROOK Ceph Storage solution on Virtual kubernetes clusters
Introduction
This blog is going to be something very interesting as we are going to cover 3 different concepts Rook Ceph, Virtual kubernetes clusters, Vcluster opensource tool.
Lets briefly introduce about each tool/project.
Rook Ceph
Rook is an orchestrator which helps in running ceph distributed storage system inside kubernetes cluster. This is mainly beneficial when you are running kubernetes clusters on on-premises i.e where kubernetes worker nodes are attached with raw devices/disks. Rook ceph basically leverages these raw disks and create distributed storage on top of them and provide storage ( i.e pv, pvc ) to k8s pods(apps). to put into simple words storage is part of your kubernetes cluster.
Virtual Kubernetes clusters:
To understand virtual clusters better, lets briefly talk about multi-tenancy issues/challenges that we are running into in the current ecosystem i.e with out virtualclusters.
with out virtual clusters
As we all know kubernetes is a popular container orchestration platform. In todays modern world, every organization has adopted kubernetes for deploying microservices. Kubernetes clusters are shared between multiple teams/people/projects which is what we call as“Multi-tenancy”.
Multi-tenancy in kubernetes is achieved through 2 models
- Namespace based Isolation
- Cluster Based Isolation
Namespace Based Isolation
Kubernetes Admin creates Namespaces with in k8s clusters and restrict teams/tenants to single namespace or set of namespaces. This restriction is done through RBAC(Role Based access control). Tenants/Teams can do whatever they want in these namespaces. This model/approach works fine however there are couple of drawbacks exist with this approach. Following are some of the drawbacks.
- Teams can not access global objects like CRDS(Custom resource definitions) as they are restricted to namespace level objects.
- Services in one namespace may need to connect to services in other namespaces, for this admin has to enable/create network polices . This works fine for limited number of namespaces. This is not an ideal when cluster scales with lot of teams/projects/tenants.
Cluster Based Isolation
In this approach separate cluster will be provisioned for each team/tenant. You will get better isolation because dedicated cluster will be provisioned. however this involves lot of cost.
Both approaches have their own limitations/drawbacks. Oragnization generally choose between these two models/approaches based on their budget and usecase.
But there is a better solution to address these multi-tenancy challenges.
what is that Solution?
Solution is Virtual clusters.
Virtual clusters are kubernetes clusters that runs on shared kubernetes clusters. These virtual clusters runs inside namespaces of shared kubernetes clusters.
How virtual clusters addresses aforementioned multi-tenancy challenges
Every team/project gets their own dedicated virtual cluster(k8s cluster). This dedicated virtualcluster can be provisioned by either admin or normal developers(who has permissions to create pods, statefulset i.e namespace level privileges) i.e providing self service capability. They(team/project) are admin on those dedicated virtual clusters which means they can do whatever they want. They can access global resource objects i.e CRDS, they can create namespaces etc etc.
Cost: Virtual clusters are very light weight. Provisioning and tear down of virtual clusters is very fast. Hence no cost involved in it.
Isolation: Better isolation is achieved because every team gets dedicated k8s cluster.
So this way Virtual cluster helps in addressing multi tenancy issues.
Vcluster
vcluster is a product of Loft labs. it is an opensource which helps you in creating virtual clusters. I will write seperate blog on Vcluster architecture and internals of it. In this blog anyway I am going cover it at a very highlevel.
using Vcluster solution Virtualclusters can be created in 2 ways
- vcluster cli
- helm
In this blog we are going to discuss about Helm approach(discussed in later steps).
How Virtualclusters works under the hood
Just like every kubernetes cluster has 2 components i.e controlplane and worker nodes, Virtualcluster also contains 2 components ie control plane & workernodes. when it comes to virtualcluster
Control plane — This runs as part of statefulset pod.
Worker nodes — There are no seperate worker nodes. Underlying host cluster worker nodes are used by virtualcluster for scheduling workloads.
Any pod which is created on virtualcluster gets synchronized to host cluster. This has to be done because virtualcluster dont have any specific worker nodes so virtualcluster pod will be scheduled on underlying host cluster worker node.
But who does this synchronization?
Ans: Syncer
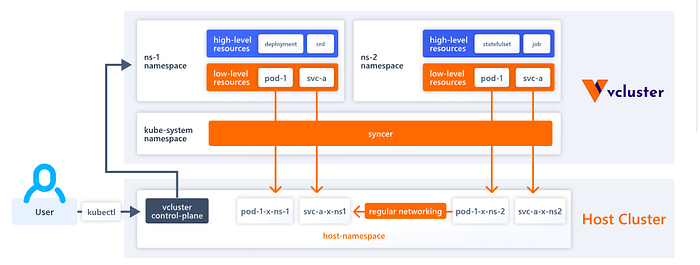
Virtualcluster runs with a component named syncer(part of statefulset pod) which is reponsible for synchronizing lowlevel resources(pods) to hostcluster.
Note: only low level resources(pods) are synchronized, highlevel resources(deployments,statefulsets) are not synchronized.
Pre-requisites:
- kubernetes cluster.
You can use any kubernetes cluster. Makesure your kubernetes cluster nodes are attached with raw disks(with out any partitions & with out any filesystems) as raw disks will be utilized by rook ceph storage.
Just follow along with me if you want to create one Kubernetes cluster. I will be creating RKE1 cluster in this blog. I am going to setup RKE1 kubernetes cluster on Vagrant machines. So lets install all the required softwares first.
Installing Required softwares
Virtualbox
Download virtualbox from this url
Based on your host OS choose the respective installer. Since I am using Ubuntu 20.04 as base machine(Laptop). I am downloading the .deb package and installing it. Execute below commands.
# Downloading virtualbox package

wget https://download.virtualbox.org/virtualbox/7.0.18/virtualbox-7.0_7.0.18-162988~Ubuntu~focal_amd64.deb

# Installing virtualbox package

sudo dpkg -i virtualbox-7.0_7.0.18-162988~Ubuntu~focal_amd64.deb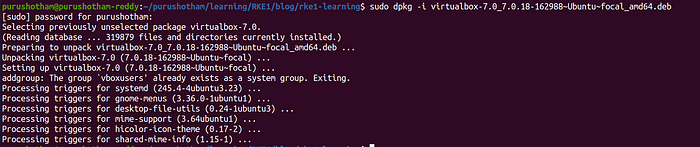
Once the installation is over you can see Virtualbox under installed softwares on your Laptop.
Vagrant cli installation
Vagrant can be downloaded from this page. Choose respective os and arch while downloading installer.
Since I am on ubuntu machine I will be executing below commands.
wget https://releases.hashicorp.com/vagrant/2.4.1/vagrant_2.4.1_linux_amd64.zip

unzip vagrant_2.4.1_linux_amd64.zip

chmod +x vagrant

sudo mv vagrant /usr/bin
You can verify vagrant installation by executing below commands.
vagrant --version

which vagrant
rke cli installation
Execute below commands.
wget https://github.com/rancher/rke/releases/download/v1.5.10/rke_linux-amd64

chmod +x rke_linux-amd64

sudo mv rke_linux-amd64 /usr/bin/rke

which rke
To install rke cli for other OS and arch refer to this page.
helm cli installation
Execute below commands.
wget https://get.helm.sh/helm-v3.15.1-linux-amd64.tar.gz

tar -zxvf helm-v3.15.1-linux-amd64.tar.gz

chmod +x linux-amd64/helm

sudo mv linux-amd64/helm /usr/bin

rm -rf linux-amd64/

rm -rf helm-v3.15.1-linux-amd64.tar.gz
you can verify the successful installation of helm using below commands.
helm version

which helm
Installing Vagrant machines with extra disk attached
Now the next step is to create vagrant machines(VMS) with extra disk attached. This extra storage or disk will be utilized by rook ceph distribution storage system.
Execute below commands.
git clone https://github.com/purushothamkdr453/rke1-learning.git

cd rke1-learning/rook-ceph-setup-on-virtual-clusters/

ls -lrt
Open Vagrantfile and replace <Replace this> placeholder with your bridge network.
Bridge network in this case means — the Interface(which has IP address) which is connected to your WIFI/Internet.
For example in my case if run ip a command.
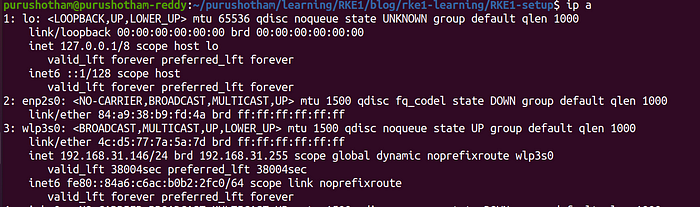
My laptop is connected to home wifi network through wlp3s0(shown above).
So <Replace this> should be changed to wlp3s0 inside Vagrantfile.
Note: There are 2 occurrences of <Replace this> placeholder. Makesure all the placeholders are updated.
Besides Vagrantfile contains following line which indicates that extra storage of 20GB is attached to every VM(which will be provisioned).
node.vm.disk :disk, size: "20GB", name: "extra_storage"In our case we are going to provision 2 nodes(out of which 1st node will be used as k8s master node & 2nd node will be used k8s worker node). in case if you want to provision more vagrant machines(aka nodes) tweak Vagrantfile as per your needs.
Finally execute vagrant up command to provision VMS.
vagrant upthe above command will take a while(depends on network bandwidth) as it has to download vagrant boxs, and execute the bootstrap shell script(installs docker, updates sysctl settings, disable swap).
Wait until the above command execution is successful. Once it is over you should see vagrant machines under virtualbox.

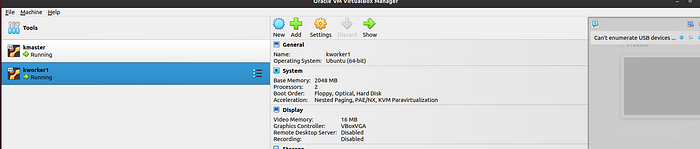
Each vagrant machine is running with Ubuntu 20.04 OS and docker installed in it.
kmaster is using 2 CPU & 4GB RAM
kworker1 is using 2CPU and 2GB RAM
you can adjust these values inside Vagrantfile(self explanatory)
Lets verify whether extra disk is attached to each of these VMS or not by executing below commands.
# ssh into kmaster Vagrant machine

vagrant ssh kmaster

# list block devices

lsblk

# exit from machine

exit
if you see sdc with 20GB under lsblk output then it means extra storage is attached to VM(20GB configuration is defined inside Vagrantfile — refer to previous section).

Repeat the same process for worker nodes.
# ssh into kmaster Vagrant machine

vagrant ssh kworker1

# list block devices

lsblk

# exit from machine

exit
Installing RKE1 cluster
Now we have nodes(vagrant machines) on which we are going to install RKE1 k8s cluster.
in the current directory you should see a file named “cluster.yml”. This is a configuration file for RKE1 which is used to provision RKE1 k8s cluster. However there placeholders which need to change before applying it.
Lets go over each and every placeholder attributes.
<MASTER IPADDRESS> — You can get this ip address by ssh into kmaster node. Execute below commands.
vagrant ssh kmaster

ip a show enp0s8

exit
Screenshots added below for reference.
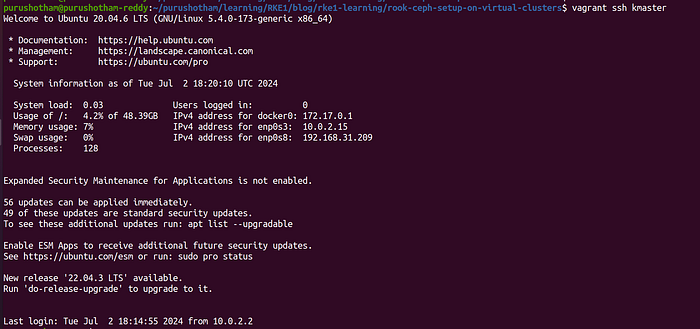

So the highlighted ip address in above screenshot is the value of <MASTER IPADDRESS>
Replace <MASTER IPADDRESS> with 192.168.31.180 inside cluster.yml
<WORKERNODE1 IPADDRESS>
Now lets repeat the same process for <WORKERNODE1 IPADDRESS> as well.
vagrant ssh kworker1

ip a show enp0s8

exit
So the highlighted ip address in above screenshot is the value of <WORKERNODE1 IPADDRESS>
Replace <WORKERNODE1 IPADDRESS> with 192.168.31.97 inside cluster.yml
<MASTERNODE KEY>
we need to get the sshkey for the master node vagrant machine. For this execute the below command.
vagrant ssh-config kmaster
Copy the value under IdentityFile(highlighted above in the screenshot) and replace it with <MASTERNODE KEY> inside cluster.yml
<WORKERNODE1 KEY>
we need to get the sshkey for the worker node vagrant machine. For this execute below command.
vagrant ssh-config kworker1
Copy the value under IdentityFile(highlighted above in the screenshot) and replace it with <WORKERNODE1 KEY> inside cluster.yml
with this we have replaced all the placeholder attributes. End cluster.yml file should like something like this.
cluster_name: rkelearning
network:
  plugin: canal
  options:
    canal_iface: enp0s8
nodes:
    - address: 192.168.31.180
      user: vagrant
      role:
        - controlplane
        - etcd
        - worker
      ssh_key_path: /home/purushotham/purushotham/learning/RKE1/blog/rke1-learning/rook-ceph-setup-on-virtual-clusters/.vagrant/machines/kmaster/virtualbox/private_key
    - address: 192.168.31.97
      user: vagrant
      role:
        - worker
      ssh_key_path: /home/purushotham/purushotham/learning/RKE1/blog/rke1-learning/rook-ceph-setup-on-virtual-clusters/.vagrant/machines/kworker1/virtualbox/private_key
Now lets create the RKE1 k8s cluster by execute below command.
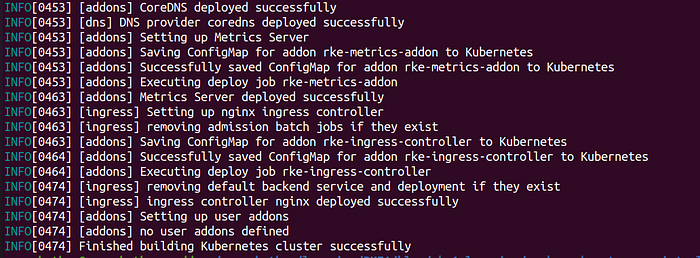
rke upthe above command takes some time as it downloads container images and runs k8s cluster components as part of docker containers on each node(vagrant machine).
Here is truncated output of the above command.
The above command generates 2 files.
cluster.rkestate — RKE1 k8s clusters maintain its state in a file called cluster.rkestate.
kube_config_cluster.yml — Kubeconfig file of the created cluster
These 2 files are generated in the current directory.

Now lets connect to created k8s cluster using generated kubeconfig.
export KUBECONFIG=./kube_config_cluster.yml

kubectl get nodes

kubectl get pods -n kube-system
Note: Wait until all the pods in kube-system moves into up and running state.
RKE uses canal as network plugin(which is a combination of Calico and flannel).
Installing ROOK CEPH on RKE1 kubernetes cluster
Now next step is to install rook ceph stroage solution on RKE1 kubernets cluster(created in previous step).
git clone --single-branch --branch v1.14.7 https://github.com/rook/rook.git


# Installing CRDS, Rook ceph operator

kubectl apply -f ./rook/deploy/examples/crds.yaml -f ./rook/deploy/examples/common.yaml -f ./rook/deploy/examples/operator.yaml
The above command installs CRDs, and rook ceph operator pod. Wait until the operator pods comes into up and running state.

Next lets install ceph cluster. Execute below command.
# Installing Ceph cluster

kubectl apply -f ./rook/deploy/examples/cluster-test.yaml
The above command creates new pods(plugin provisioner, osd pods, mon pod, manager pods etc). I will write a seperate blog about rook ceph, its internals, architecture etc . For now lets inspect on new pods. Execute below command.
kubectl get pods -n rook-ceph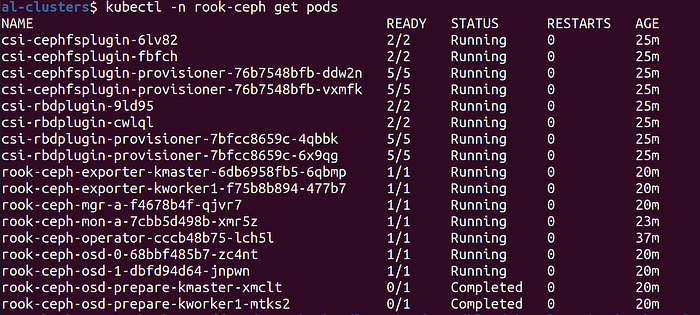
Wait until all the pods(cephfs plugin, cephfs plugin provisioners, rbd plugin, rbd plugin provisioners, mgr pod, mon pod, osd pods) come up and running state.
osd pod will be created for each device. In this case there are 2 devices are attached(refer to vagrant file 20GB storage configuration).
Now the next step is to create Storage classes. Seperate storageclasses will be created for each type i.e for blockstorage and filesystem storage. Execute below commands.
# Create storage class for block storage(rbd)

kubectl apply -f ./rook/deploy/examples/csi/rbd/storageclass.yaml
# Create storage class for filesystem storage

kubectl apply -f ./rook/deploy/examples/csi/cephfs/storageclass.yaml
Now list storage classes.
kubectl get sc
With this we have completed rook ceph installation on Base Cluster/Host cluster(RKE1 cluster). Now we can leverage these storage classes and deploy statefulset apps inside kubernetes cluster(host cluster).
Statefulset apps leverage the underlying raw disks in this way.
App or pod -> PVC -> PV -> CSI(RBD Image) — OSD
Now lets make rook-ceph-block storage class as default storageclass. Execute below command.
kubectl patch storageclass rook-ceph-block -p '{"metadata": {"annotations":{"storageclass.kubernetes.io/is-default-class":"true"}}}'
Installing Virtual cluster on RKE1 kubernetes cluster
Next step is to install Virtual cluster using vCluster on Base cluster. In this case Base cluster is RKE1 kubernetes cluster. Sometime base cluster is also referred as host cluster. Base Cluster & Host Cluster are used interchangeably.
Since Virtual clusters will be created on top of base clusters. Lets choose a dedicated namespace(on host kubernetes cluster) to host virtualclusters. Execute below command to create namespace.
# Create dedicated namespace for hosting virtualclusters

kubectl create namespace virtualclusters
Lets add helm repository of vcluster(which contains vcluster helm chart).
helm repo add vcluster https://charts.loft.shLets prepare the helm values for virtualcluster. We already have a sample vcluster helm values file named “vcluster-values.yaml” in the cloned directory. However we have couple of placeholders. lets replace them.
There is a line under syncer extra args
- --tls-san=<Node1 IPAddress>,<Node2 IPAddress>....,<Noden IPAddress>Replace <Node1 IPAddress>,<Node2 IPAddress> placeholders with vagrant machine node ips(depending on number of nodes) with comma delimited. After replacing it should look like below.
- --tls-san=192.168.31.180,192.168.31.97
After replacing whole helm values file(vcluster-values.yaml) should look something like this.
sync:
  nodes:
    enabled: true
  persistentvolumes:
    enabled: true
  hoststorageclasses:
    enabled: true
syncer:
  extraArgs:
  - --tls-san=192.168.31.180,192.168.31.97
plugin:
  import-secrets:
    version: v2
    image: ghcr.io/loft-sh/vcluster-example-import-secrets:v1
    imagePullPolicy: IfNotPresent
Now lets install the virtualcluster using helm install commad. Choose any Release name. In this case I am choosing release name as “my-vcluster”.
# Before replacing Placeholder: Helm install command for installing Virtualcluster

# helm install <Release Name> vcluster/vcluster -n virtualclusters -f vcluster-values.yaml

# After replacing <Release Name> Placeholder command

helm install my-vcluster vcluster/vcluster -n virtualclusters -f vcluster-values.yaml
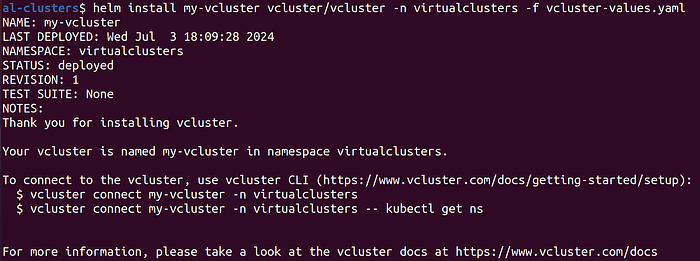
the above helm command will install statefulset pod inside virtualclusters namespace. Lets inspect them.
kubectl get pods -n virtualclusters
Above Output contains 2 pods i.e statefulset pod & coredns pod.
Control plane: Virtual cluster control plane runs in form of Statetfulset pod( <Release Name>-0 i.e my-vcluster-0). This pod contains control plane components for Virtualcluster(i.e apiserver, controller manager, store).
Coredns: Seperate coredns pod will be created for each virtualcluster.
Now lets create a nodeport service for the created Virtualcluster. This nodeport service is used for accessing Virtualcluster apiserver. There is a sample file named “vcluster-nodeportservice.yaml” already exists inside Cloned directory.
Makesure you replace <Release Name> placeholder with releasename(my-vcluster)inside “vcluster-nodeportservice.yaml” before executing the next command.
i.e in this case change <Release Name> to my-vcluster.
kubectl apply -f vcluster-nodeportservice.yamlNow list the services.
kubectl get svc -n virtualclusters | grep vcluster-nodeport
Make a note of the Nodeport(31261) which will be used later.
we ran “helm install” command for creating virtualcluster. it creates several secrets under the hood.
kubectl get secrets -n virtualclusters
One of the secret(vc-<Release Name> i.e vc-my-vcluster) contains kubeconfig content for virtualcluster. Execute below command to get kubeconfig.
kubectl get secret vc-my-vcluster -o json -n virtualclusters | jq -r .data.config | base64 -d > virtualcluster-kubeconfig.yamlAbove command writes kubeconfig of virtualcluster to a new file named “virtualcluster-kubeconfig.yaml”.

Open the kubeconfig file i.e virtualcluster-kubeconfig.yaml”. it should look something like this.
apiVersion: v1
clusters:
- cluster:
    certificate-authority-data: LS0tLS1CRUdJTiBDRVJUSUZJQ0FURS0tLS0tCk1JSUJkekNDQVIyZ0F3SUJBZ0lCQURBS0JnZ3Foa2pPUFFRREFqQWpNU0V3SHdZRFZRUUREQmhyTTNNdGMyVnkKZG1WeUxXTmhRREUzTWpBMU1UTTVNVFV3SGhjTk1qUXdOekE1TURnek1UVTFXaGNOTXpRd056QTNNRGd6TVRVMQpXakFqTVNFd0h3WURWUVFEREJock0zTXRjMlZ5ZG1WeUxXTmhRREUzTWpBMU1UTTVNVFV3V1RBVEJnY3Foa2pPClBRSUJCZ2dxaGtqT1BRTUJCd05DQUFSTjl2UUFwbHRvMXAxZmMrS215ampPSXo0dWE3c2IvRE5iZklJV2NTMDgKQmltN00rQ1BHV1VnbUw2ODMzRmR6UXYrbXpPeU1iTDN2QUNLcTJUSkEwR1RvMEl3UURBT0JnTlZIUThCQWY4RQpCQU1DQXFRd0R3WURWUjBUQVFIL0JBVXdBd0VCL3pBZEJnTlZIUTRFRmdRVU1PNTJzUlZOWC9mNW43bnAvMjVaCjhMVk56MlF3Q2dZSUtvWkl6ajBFQXdJRFNBQXdSUUlnY2hYQlY5UjQyejRLU2JqemV2YWpTcG0zRkVwNkxFNysKY1pZcVd5b24za29DSVFDQjRMTC9uUHNrejZlZjZPY25wNUI3dE1DWFRMbEZZZmlYcGdicWVCTHhhdz09Ci0tLS0tRU5EIENFUlRJRklDQVRFLS0tLS0K
    server: https://localhost:8443
  name: my-vcluster
contexts:
- context:
    cluster: my-vcluster
    user: my-vcluster
  name: my-vcluster
current-context: my-vcluster
kind: Config
preferences: {}
users:
- name: my-vcluster
  user:
    client-certificate-data: LS0tLS1CRUdJTiBDRVJUSUZJQ0FURS0tLS0tCk1JSUJrVENDQVRlZ0F3SUJBZ0lJYmJVVGdhM0tRY2N3Q2dZSUtvWkl6ajBFQXdJd0l6RWhNQjhHQTFVRUF3d1kKYXpOekxXTnNhV1Z1ZEMxallVQXhOekl3TlRFek9URTFNQjRYRFRJME1EY3dPVEE0TXpFMU5Wb1hEVEkxTURjdwpPVEE0TXpFMU5Wb3dNREVYTUJVR0ExVUVDaE1PYzNsemRHVnRPbTFoYzNSbGNuTXhGVEFUQmdOVkJBTVRESE41CmMzUmxiVHBoWkcxcGJqQlpNQk1HQnlxR1NNNDlBZ0VHQ0NxR1NNNDlBd0VIQTBJQUJBVVN6TTduQkZCL3RJMnoKa1B6bXZXMDZFU0Q5SWlnb1ExeG00dSsrdU1vc0puSU95ek9KRTVMOGY2SnVva2hFRXBaNlJNZzFuamVCeXowNAptMVFtVlNxalNEQkdNQTRHQTFVZER3RUIvd1FFQXdJRm9EQVRCZ05WSFNVRUREQUtCZ2dyQmdFRkJRY0RBakFmCkJnTlZIU01FR0RBV2dCU2NPSEVZcGRCMlkwVzFJMXdYZ0JKWEc2a2o1ekFLQmdncWhrak9QUVFEQWdOSUFEQkYKQWlBR29nR2hORmM2Q2RiR1FXRmozdGpiUlF1U3FRZFdWZWJIZm95c0pRZCtiQUloQU80cGxhNlJuTkg4K2tJcApXN2VRdjh4ZmxKMTFYWEwyRU1MbDZWWnlXUHdECi0tLS0tRU5EIENFUlRJRklDQVRFLS0tLS0KLS0tLS1CRUdJTiBDRVJUSUZJQ0FURS0tLS0tCk1JSUJlRENDQVIyZ0F3SUJBZ0lCQURBS0JnZ3Foa2pPUFFRREFqQWpNU0V3SHdZRFZRUUREQmhyTTNNdFkyeHAKWlc1MExXTmhRREUzTWpBMU1UTTVNVFV3SGhjTk1qUXdOekE1TURnek1UVTFXaGNOTXpRd056QTNNRGd6TVRVMQpXakFqTVNFd0h3WURWUVFEREJock0zTXRZMnhwWlc1MExXTmhRREUzTWpBMU1UTTVNVFV3V1RBVEJnY3Foa2pPClBRSUJCZ2dxaGtqT1BRTUJCd05DQUFUQlRpaTUzeHl4QlFuTmtROFVMU2owaEl6RnpqNGNIVjhwU0JNNWFsdTEKVTF3UnZmWEZMRWNrc2NKaCtTUDZ3WGJxZVU5RGp5eXpKajJZczdNdHpDdUFvMEl3UURBT0JnTlZIUThCQWY4RQpCQU1DQXFRd0R3WURWUjBUQVFIL0JBVXdBd0VCL3pBZEJnTlZIUTRFRmdRVW5EaHhHS1hRZG1ORnRTTmNGNEFTClZ4dXBJK2N3Q2dZSUtvWkl6ajBFQXdJRFNRQXdSZ0loQUovaUZMaWZCVEsrTytrd2hxbXZhbXR0T2hvZktGWW0Kc1p0VmpUR29TcWVqQWlFQXFQRnAvV3dhZHBUYXhsUjUyQXR3YlVXNUg0ZDYwWWNheGEyekFNc1JBdlE9Ci0tLS0tRU5EIENFUlRJRklDQVRFLS0tLS0K
    client-key-data: LS0tLS1CRUdJTiBFQyBQUklWQVRFIEtFWS0tLS0tCk1IY0NBUUVFSUdCRXp0dnl4UW9IYXlRbkQrVVpOc005RTA1QlNyQ3FhSVpsRDZQRmUxQXBvQW9HQ0NxR1NNNDkKQXdFSG9VUURRZ0FFQlJMTXp1Y0VVSCswamJPUS9PYTliVG9SSVAwaUtDaERYR2JpNzc2NHlpd21jZzdMTTRrVAprdngvb202aVNFUVNsbnBFeURXZU40SExQVGliVkNaVktnPT0KLS0tLS1FTkQgRUMgUFJJVkFURSBLRVktLS0tLQo=
we need to replace server address i.e https://localhost:8443.
replace localhost with any node ip(Any vagrant machine ip).
Replace port(8443) with nodeport(31261- which is created previously)
so https://localhost:8443 changed to https://192.168.31.180:31261
After replacement kubeconfig content should look something like this.
apiVersion: v1
clusters:
- cluster:
    certificate-authority-data: LS0tLS1CRUdJTiBDRVJUSUZJQ0FURS0tLS0tCk1JSUJkekNDQVIyZ0F3SUJBZ0lCQURBS0JnZ3Foa2pPUFFRREFqQWpNU0V3SHdZRFZRUUREQmhyTTNNdGMyVnkKZG1WeUxXTmhRREUzTWpBMU1UTTVNVFV3SGhjTk1qUXdOekE1TURnek1UVTFXaGNOTXpRd056QTNNRGd6TVRVMQpXakFqTVNFd0h3WURWUVFEREJock0zTXRjMlZ5ZG1WeUxXTmhRREUzTWpBMU1UTTVNVFV3V1RBVEJnY3Foa2pPClBRSUJCZ2dxaGtqT1BRTUJCd05DQUFSTjl2UUFwbHRvMXAxZmMrS215ampPSXo0dWE3c2IvRE5iZklJV2NTMDgKQmltN00rQ1BHV1VnbUw2ODMzRmR6UXYrbXpPeU1iTDN2QUNLcTJUSkEwR1RvMEl3UURBT0JnTlZIUThCQWY4RQpCQU1DQXFRd0R3WURWUjBUQVFIL0JBVXdBd0VCL3pBZEJnTlZIUTRFRmdRVU1PNTJzUlZOWC9mNW43bnAvMjVaCjhMVk56MlF3Q2dZSUtvWkl6ajBFQXdJRFNBQXdSUUlnY2hYQlY5UjQyejRLU2JqemV2YWpTcG0zRkVwNkxFNysKY1pZcVd5b24za29DSVFDQjRMTC9uUHNrejZlZjZPY25wNUI3dE1DWFRMbEZZZmlYcGdicWVCTHhhdz09Ci0tLS0tRU5EIENFUlRJRklDQVRFLS0tLS0K
    server: https://192.168.31.180:31261
  name: my-vcluster
contexts:
- context:
    cluster: my-vcluster
    user: my-vcluster
  name: my-vcluster
current-context: my-vcluster
kind: Config
preferences: {}
users:
- name: my-vcluster
  user:
    client-certificate-data: LS0tLS1CRUdJTiBDRVJUSUZJQ0FURS0tLS0tCk1JSUJrVENDQVRlZ0F3SUJBZ0lJYmJVVGdhM0tRY2N3Q2dZSUtvWkl6ajBFQXdJd0l6RWhNQjhHQTFVRUF3d1kKYXpOekxXTnNhV1Z1ZEMxallVQXhOekl3TlRFek9URTFNQjRYRFRJME1EY3dPVEE0TXpFMU5Wb1hEVEkxTURjdwpPVEE0TXpFMU5Wb3dNREVYTUJVR0ExVUVDaE1PYzNsemRHVnRPbTFoYzNSbGNuTXhGVEFUQmdOVkJBTVRESE41CmMzUmxiVHBoWkcxcGJqQlpNQk1HQnlxR1NNNDlBZ0VHQ0NxR1NNNDlBd0VIQTBJQUJBVVN6TTduQkZCL3RJMnoKa1B6bXZXMDZFU0Q5SWlnb1ExeG00dSsrdU1vc0puSU95ek9KRTVMOGY2SnVva2hFRXBaNlJNZzFuamVCeXowNAptMVFtVlNxalNEQkdNQTRHQTFVZER3RUIvd1FFQXdJRm9EQVRCZ05WSFNVRUREQUtCZ2dyQmdFRkJRY0RBakFmCkJnTlZIU01FR0RBV2dCU2NPSEVZcGRCMlkwVzFJMXdYZ0JKWEc2a2o1ekFLQmdncWhrak9QUVFEQWdOSUFEQkYKQWlBR29nR2hORmM2Q2RiR1FXRmozdGpiUlF1U3FRZFdWZWJIZm95c0pRZCtiQUloQU80cGxhNlJuTkg4K2tJcApXN2VRdjh4ZmxKMTFYWEwyRU1MbDZWWnlXUHdECi0tLS0tRU5EIENFUlRJRklDQVRFLS0tLS0KLS0tLS1CRUdJTiBDRVJUSUZJQ0FURS0tLS0tCk1JSUJlRENDQVIyZ0F3SUJBZ0lCQURBS0JnZ3Foa2pPUFFRREFqQWpNU0V3SHdZRFZRUUREQmhyTTNNdFkyeHAKWlc1MExXTmhRREUzTWpBMU1UTTVNVFV3SGhjTk1qUXdOekE1TURnek1UVTFXaGNOTXpRd056QTNNRGd6TVRVMQpXakFqTVNFd0h3WURWUVFEREJock0zTXRZMnhwWlc1MExXTmhRREUzTWpBMU1UTTVNVFV3V1RBVEJnY3Foa2pPClBRSUJCZ2dxaGtqT1BRTUJCd05DQUFUQlRpaTUzeHl4QlFuTmtROFVMU2owaEl6RnpqNGNIVjhwU0JNNWFsdTEKVTF3UnZmWEZMRWNrc2NKaCtTUDZ3WGJxZVU5RGp5eXpKajJZczdNdHpDdUFvMEl3UURBT0JnTlZIUThCQWY4RQpCQU1DQXFRd0R3WURWUjBUQVFIL0JBVXdBd0VCL3pBZEJnTlZIUTRFRmdRVW5EaHhHS1hRZG1ORnRTTmNGNEFTClZ4dXBJK2N3Q2dZSUtvWkl6ajBFQXdJRFNRQXdSZ0loQUovaUZMaWZCVEsrTytrd2hxbXZhbXR0T2hvZktGWW0Kc1p0VmpUR29TcWVqQWlFQXFQRnAvV3dhZHBUYXhsUjUyQXR3YlVXNUg0ZDYwWWNheGEyekFNc1JBdlE9Ci0tLS0tRU5EIENFUlRJRklDQVRFLS0tLS0K
    client-key-data: LS0tLS1CRUdJTiBFQyBQUklWQVRFIEtFWS0tLS0tCk1IY0NBUUVFSUdCRXp0dnl4UW9IYXlRbkQrVVpOc005RTA1QlNyQ3FhSVpsRDZQRmUxQXBvQW9HQ0NxR1NNNDkKQXdFSG9VUURRZ0FFQlJMTXp1Y0VVSCswamJPUS9PYTliVG9SSVAwaUtDaERYR2JpNzc2NHlpd21jZzdMTTRrVAprdngvb202aVNFUVNsbnBFeURXZU40SExQVGliVkNaVktnPT0KLS0tLS1FTkQgRUMgUFJJVkFURSBLRVktLS0tLQo=
Now lets try accessing the virtual cluster using above kubeconfig.
kubectl --kubeconfig virtualcluster-kubeconfig.yaml get node

kubectl --kubeconfig virtualcluster-kubeconfig.yaml get ns
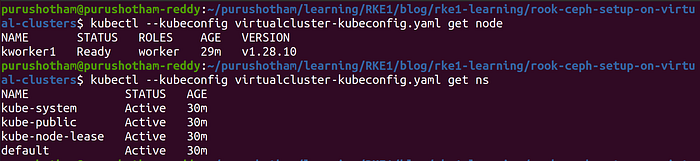
As shown in above screenshot we can successfully access virtualcluster and default namespaces are listed.
However for virtualcluster to access/use the underlying rook ceph storage(which is installed on host cluster/base cluster) it requires rook secrets. These rook secrets are already created while installing rook ceph on host cluster. So we need to copy these secrets to virtualcluster.
we have 2 options
- Manually copy the secret content into yaml files and apply those yamls on virtualcluster.
- Copy rook secrets content yamls and apply them to namespace where virtualclusters are installed on host/base cluster and let those secrets automatically synchronize to virtualcluster.
We are going to use second option in this blog.
Lets copy the existing rook secrets and annotate them and apply them to host namspace(namespace where virtualclusters are installed).
rook-csi-cephfs-node
kubectl -n rook-ceph get secret rook-csi-cephfs-node -o yaml > rook-csi-cephfs-node.yamlwe have to make couple of changes inside rook-csi-cephfs-node.yaml file.
Change namespace attribute value to virtualclusters.
and add the below annotation
 annotations:
      vcluster.loft.sh/import: rook-ceph/rook-csi-cephfs-node
Remove unnecessary attribues like ownerReferences, resourceVersion, uid, creationTimestamp
After replacing namespace attribute value & adding annotation yaml & removing unnecessary attributes content should something like this.
apiVersion: v1
data:
  adminID: Y3NpLWNlcGhmcy1ub2Rl
  adminKey: QVFBZjZZeG1VWEg1SlJBQXY3aHFNSzNZL1ZPSVU5Y0VTSG1qMXc9PQ==
kind: Secret
metadata:
  name: rook-csi-cephfs-node
  namespace: virtualclusters
  annotations:
      vcluster.loft.sh/import: rook-ceph/rook-csi-cephfs-node
type: kubernetes.io/rook
Lets apply the modified yaml file.
kubectl apply -f rook-csi-cephfs-node.yamlNote: Makesure that you are on base/host cluster(in this case it is RKE1 cluster).
Now lets switch to Virtuacluster to verify whether secret is synchronized or not. Execute below command.
kubectl --kubeconfig virtualcluster-kubeconfig.yaml get ns

kubectl --kubeconfig virtualcluster-kubeconfig.yaml get secrets -n rook-ceph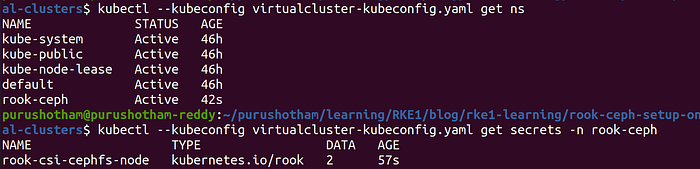
As you can notice in the above screenshot new namespace named “rook-ceph” is created and with in which rook-csi-cephfs-node secret is synchronized or copied from host cluster.
But how did this happen?
This happens due to “vcluster-example-import-secrets” plugin which is supplied while installing virtualcluster. Refere to helm values. Configuration snippet is below.
plugin:
  import-secrets:
    version: v2
    image: ghcr.io/loft-sh/vcluster-example-import-secrets:v1
    imagePullPolicy: IfNotPresent
This plugin is responsible for importing secrets from host cluster namespace(namespace where virtualclusters are installed) to virtual clusters namespace.
Now lets repeat the same process for other secrets as well.
rook-csi-cephfs-provisioner
kubectl -n rook-ceph get secret rook-csi-cephfs-provisioner -o yaml > rook-csi-cephfs-provisioner.yamlwe have to make couple of changes inside rook-csi-cephfs-provisioner.yaml file.
Change namespace attribute value to virtualclusters.
and add the below annotation
annotations:
      vcluster.loft.sh/import: rook-ceph/rook-csi-cephfs-provisioner
Remove unnecessary attribues like ownerReferences, resourceVersion, uid, creationTimestamp
After replacing namespace attribute value & adding annotation yaml & removing unnecessary attributes content should something like this.
apiVersion: v1
data:
  adminID: Y3NpLWNlcGhmcy1wcm92aXNpb25lcg==
  adminKey: QVFBZjZZeG1TL0RMRlJBQXI0QlhjbXhtRjRqVDBYOWV0Z3BvbGc9PQ==
kind: Secret
metadata:
  name: rook-csi-cephfs-provisioner
  namespace: virtualclusters
  annotations:
      vcluster.loft.sh/import: rook-ceph/rook-csi-cephfs-provisioner
type: kubernetes.io/rook
Lets apply the modified yaml file.
kubectl apply -f rook-csi-cephfs-provisioner.yamlNote: Makesure that you are on base/host cluster(in this case it is RKE1 cluster).
Now lets switch to Virtuacluster to verify whether secret is synchronized or not. Execute below command.
kubectl --kubeconfig virtualcluster-kubeconfig.yaml get ns

kubectl --kubeconfig virtualcluster-kubeconfig.yaml get secrets -n rook-ceph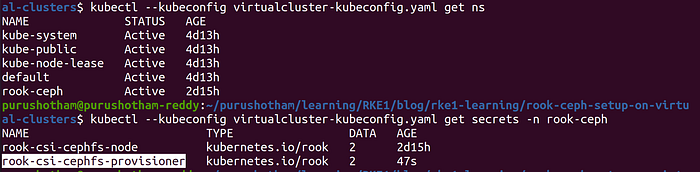
As shown in the above screenshot, rook-csi-cephfs-provisioner secret is copied/synchronized. This happens automatically due to plugin configuration specified in helm values file(vcluster installation helm values file).
Plugin configuration snippet mentioned below for reference. you can find this inside helm values file.
plugin:
  import-secrets:
    version: v2
    image: ghcr.io/loft-sh/vcluster-example-import-secrets:v1
    imagePullPolicy: IfNotPresent
Repeat the same process for other secrets as well i.e rook-csi-rbd-node & rook-csi-rbd-provisioner secrets.
Make sure the proper annotations are given for rook secrets.
rook-csi-rbd-node
annotations:
     vcluster.loft.sh/import: rook-ceph/rook-csi-rbd-node
rook-csi-rbd-provisioner
annotations:
     vcluster.loft.sh/import: rook-ceph/rook-csi-rbd-provisioner
After applying the above secrets, on virtualcluster you should see all the above mentioned secrets.
kubectl --kubeconfig virtualcluster-kubeconfig.yaml get secrets -n rook-ceph
So now we have all the required rook secrets on virtualcluster. So now virtualcluster can interact with underlying rook ceph storage.
Lets verify this by deploying a sample pod. But before that lets verify storage classes.
kubectl --kubeconfig virtualcluster-kubeconfig.yaml get sc
As shown in the above screenshot storage classes are available on virtualcluster. How is this possible? Well ans is underlying hostcluster storage classes are synchronized to virtualcluster. Refer to virtualcluster helm values for this setting.
Create PVC, pod by executing below command.
kubectl --kubeconfig virtualcluster-kubeconfig.yaml apply -f ./rook/deploy/examples/csi/rbd/pvc.yaml

kubectl --kubeconfig virtualcluster-kubeconfig.yaml apply -f ./rook/deploy/examples/csi/rbd/pod.yaml
Now lets verify created pods, pvc.
kubectl --kubeconfig virtualcluster-kubeconfig.yaml get pods

kubectl --kubeconfig virtualcluster-kubeconfig.yaml get pvc

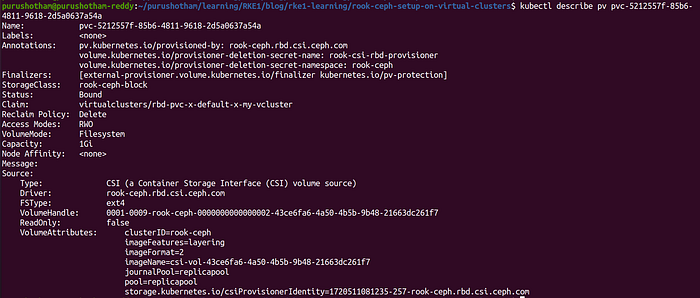
csirbd-demo-pod shown in above screenshot is leveraging rbd-pvc pvc. rbd-pvc uses rook-ceph-block storage class and this pvc requests for pv which will be created on the fly. Created PV uses the underlying rookceph storage.
output of the PV shows rook storage details(CSI Driver, volumehandle, Volume attributes). Here is the output of pv.
So the whole workflow is as follows.
App(pod) → PVC -> PV -> CSI RBD Image(shown in above screenshot under describe pv output under Volumeattributes -> imageName)-> OSD -> Raw disks
Mapping of CSI RBD image to OSD mapping can be found under tool box pod.
Lets create toolbox pod by executing below command.
kubectl apply -f ./rook/deploy/examples/toolbox.yamlNote: Makesure you are on host/base cluster while executing above command.
kubectl get pods -n rook-ceph | grep tool
exec into above pod and execute below command.
rbd showmapped
The above command will provide you mapping between CSI RBD image and OSD(ID column shown in above screenshot) and backend raw disk device. OSD is the components which uses underlying raw disks.
Hope now end to end workflow is clear.
Now one last important thing to remember is whatever workloads that are created on virutalcluster are synchronized to host cluster. On hostcluster they are synchronized to namespace(wherever virtualclusters are created. In this case namespace is virtualclusters). Lets verify this.
kubectl -n virtualclusters get pods
As shown in above screenshot csirb-demo pod which is created on virtualcluster synchronized on host cluster, however the pod name is renamed with namespace and virtualcluster name appended to it.
Note: Only low level objects like pods are synchornized to host cluster. Highlevel objects like Deployments, statefulsets will not synchronized to host cluster.
So Just to summarize every virtualcluster gets its own controlplane in form of statefulset. When it comes to workernodes Virtualclusters leverages underlying host cluster nodes.
With this we can conclude our blog. we touched various topics started with challenges in the existing ecosystem, Solutions to address those challenges, what are virtualclusters, how to implement virtualclusters using Vcluster, what is rook ceph, installing rook ceph on host cluster, leveraging rook ceph storage solution on virtualclusters.
Hope this blog is useful. Please leave a comment if you dont understand anything.